What Does It Mean to Have Clarity?

Really, I Just Want to Know!

What is “the thing” that I’m supposed to be doing? How do I know if that’s “the thing”? Maybe I should be doing “that other thing” instead? Where should I go from here? How do I know if that’s the right way? Am I the only one who feels this lost? What’s wrong with me?

So many questions, this is making my head hurt!

When I was growing up, I knew exactly what I was going to do for the rest of my life. I was going to farm with my Dad, just like he was farming with his. This was a great plan and it was going well until those plans got changed. When I was in my early thirties my Dad died, at fifty, of cancer.

We were farming together, he owned some of the equipment and I, using borrowed money, owned some. The problem at this point was, I couldn’t afford to buy his part so…I got out of farming.

In addition to farming I had been doing construction for most of the previous ten years as well. I liked doing it, was good at it, so this seemed like the logical thing to do, and it was.  

As life went on, I again began to give up on dreams, those unachievable fantasies. Who was I kidding? I wasn’t ever going to achieve anything more than mediocrity. It’s not that life wasn’t good; it was just…unfulfilled.

Then God got my attention with a board upside my head.

I survived an accident and was still alive…God wasn’t done with me yet. It was at this point I began dreaming again and believing anything was possible. I had new dreams and plans. I was excited about the possibilities…but now seven years later, I’m still trying to figure out how to turn those dreams into reality. Maybe there isn’t anything more.

I better be careful; God may do something to get my attention again.

Over the past seven years I’ve been searching for clarity and direction. I’ve prayed, read, studied, researched, listened, watched, multiple different things from a lot of different people. All good advice and very inspiring. Why is nothing changing? What am I doing wrong?

It’s been said that a rut is just a grave with both ends kicked out and here I am stuck in a rut of my own making. Walking back and forth looking for a way out isn’t working; it’s just making the rut deeper.

If I want to get out of this rut, I need to stop doing the same things hoping for different results.

God has big plans for us, and He will move mountains to create opportunities for us to achieve them. It’s up to us to move ourselves. I believe it’s Satan that causes us to stop short of those big God plans. It’s much better for him if we don’t achieve those successes. He’s the one who plants the doubt and fear. Telling us that we don’t have what it takes to do that big thing…who are we kidding.

Over the last seven years I knew my purpose and what I was supposed to be doing. This website and these weekly solutions are all part of that. At the same time, I felt as though I was just pretending…It really wasn’t going to happen. Look at the small number of follower’s that I have. No one cares about what I have to say.

Stop this, you’re being ridiculous.

In an effort to get different results, over the last few months I’ve done some “different”, some really big “different”. Big commitments of both time and money. Doing things that are way outside of my comfort zone. One of these things was joining Ray Edward’s Kingdom Builder mastermind group. This involves a weekly virtual meeting with a group of twelve specifically chosen people from around the country.

We’re just getting started and in our second meeting this past week, I was feeling overwhelmed. Once again, I asked myself, who am I kidding? I don’t belong in this group. I don’t have what it takes. These people are much better at what they’re doing than I am. I can’t afford this.

It’s happening again…Satan just shut up!

After the meeting…and wallowing a little…I remembered something that Ray said during a podcast, “Clarity starts with making a decision”. Most of us are waiting for clarity to be a simple light bulb moment. We expect it to be a bright shining mansion in the distance with a perfectly clear and straight path to get there and a chauffeur driven limousine to take us. This isn’t the way it works; clarity happens after we decide and do.

In Ray’s podcast, 7 Steps to Getting Clarity he pointed out things that if we decide and do, clarity will follow:

  1. Calling – Our purpose, the thing we are called to do.
  2. Commitment – We need to be all in.
  3. Credibility – Others see our ability in the area.
  4. Congruent – It’s something we love doing, it comes naturally.
  5. Connection – We naturally connect with those we serve.
  6. Competence – We have God given skills in this area.
  7. Consistency – We keep doing it regularly and don’t quit.

As part of my daily journaling I read Proverbs 3:5-6 every morning. “Trust in the Lord with all your heart; do not depend on your own understanding. Seek His will in all that you do, and He will show you which path to take.”, New Living Translation.

The day after the meeting last week when I read this, for the first time I realized something that confirmed what Ray was saying. It doesn’t say, trust in the Lord, seek His will and He’ll give you everything that you dreamed. It says trust in Him, seek His will in all that I DO, and He’ll show me the path.

He will show me the path…He’s not going to DO He’s going to SHOW. It’s up to me to DO. It’s good to pray, read, study, research, listen and watch, but none of this is going to DO me any good if I don’t DO something.

Clarity’s not in here…it’s out there. If I want it, I have to decide and then go get it.

The New Website Is Here, The New Website Is Here

“Things Are Going to Start Happening to Me Now”

Just like Navin R. Johnson in the movie, The Jerk, we all want to be somebody. Being somebody is more than just having your name in print in the new phone book…

or having a new website.

This doesn’t mean that we shouldn’t be excited about the newly rebuilt Solution Building website…because we are! It’s been a long process but totally worth it. Thanks Stacey with Custom Internet Services, for another fantastic job. This site is every bit as good as the Timber Creek Construction site.

Like Navin, we all start out wanting something but aren’t sure what it is or where we’ll find it. Navin’s search is filled with up and downs, successes and failures. He could have avoided some of his heartache if he’d only had access to a website where someone was sharing what they had learned from similar experiences.

Struggles are a part of life but can be reduced if we’ll some get help.

My hope for this new Solution Building website is twofold. First it is to help prevent construction companies who are struggling with a lack of business knowledge and understanding from becoming overwhelmed and unprofitable. Second is to help their customers avoid disappointment and frustration by knowing what to expect from the construction process.

We will do this by providing businesses with systems and training to make them more efficient and profitable while educating customers in what to expect through the entire construction experience.

When construction companies have the tools they need and customers know what to expect, both can achieve their dreams.

The first tool that we’re offering is the Blueprint for Building a Better Proposal. This tool consists of templates, samples and instructions on how to use the system. We are also offering a day long live workshop coming up on March 13th, where you will be given more in depth teaching and training.

You can find out more about this in these posts:

This is designed to help companies in the construction industry prepare consistent, clear accurate proposals for their customers. If you or someone you know would benefit from this Blueprint for Building a Better Proposal system, send them this link so that they can build better proposals.

The Conclusion of The Construction Proposal Is the Contract

Two men in suits shaking hands


Putting A Period at The End of The Proposal Communication


The discussion of “Building a Better Proposal” began with the problems that arise from poor communication. We talked about this being the responsibility of the contractor and some of the reasons this is a problem.


Over the last several weeks we laid out the “Blueprint for Building a Better Proposal” going over the different parts of the system, an explanation of the system, gathering of information, writing a scope of work, putting a price to the project and finally how to put all of the pieces together into a proposal ready to present to the customer.


Once you have a signed Proposal, conclude with a Contract.


The Contract completes the Proposal process and covers things beyond construction. Things like funding, additional documents, property boundaries, time within which the project will be started and terms and conditions.

  • Construction Funds – This isn’t something that is relevant to every project but will be to some. If it is, the information would be included in this section of the contract.


  • Description of the Work – A complete and full Scope of Work could be included here but not needed if the customer has been presented a Proposal. If so then a brief description of the project can be inserted and a reference to the specific Proposal and any other additional documentation, i.e. blueprints, drawings, spec sheets, governing body documents, etc.


  • Property Lines – This is another category that isn’t relevant to every project but certainly can be. If working inside of city limits, normally there are set back requirements and easements, this makes it critical to know where the property boundaries are or to have a licensed surveyor make this determination.


  • Payment – Like the description of work above, this should be in the Proposal. If no Proposal was given to the customer, then this should be specified here. If a Proposal was given repeat it again here.


  • Time for the Completion of Work – The duration of the work from start to finish is typically expressed in the Proposal. Due to the varying number of Proposals prepared and presented to customers, there’s no way of knowing what order they will be signed and returned. With the Proposal being signed and returned prior to the preparation of the Contract, the start date of the project can be determined and specified here.


  • Terms and Conditions – An in-depth explanation of specifications, descriptions, expectations, insurance, warranty, media permissions, etc. These will be specific to your company, type of work and location.


I would recommend that to have a legal expert or attorney review your Proposal and Contract templates as well as any other agreement document to make sure they meet your specific needs.


We’ve now gone through the process of meeting with a customer all the way to getting a signed Contract. Now it’s time to do the “construction” part of the project.


Communication will be needed in this part too.


Just because you have a signed Proposal and Contract don’t think the communication is done. In most construction project changes occur. These changes need to be treated like separate, sub-projects of the original with Change Orders.


This is a topic of discussion for a different day and one that we’ll have in the future.


If you know anyone in a construction trade or related industry that you think would benefit from learning the “Blueprint for Building a Better Proposal” share a link to this Weekly Solution or the to the Solution Building website. 


Don’t forget to check back in the next couple of weeks for the upcoming announcement.


How To Put The Pieces Of The Construction Proposal Together

The Last Piece Is Always the Most Fun

If you’ve ever done a jigsaw puzzle, you know how frustrating it is to get to the last piece…and you can’t find it anywhere. This is the same frustration a customer feels when they don’t have the full picture of what is to be included in their construction project.


Giving the customer a complete and thorough proposal gives them the full picture.


Doing puzzles growing up I remember when getting near the end of a puzzle the level of excitement would begin to amp up. In the accelerated push to get it finished more people would get involved, in the rush, often a piece would get lost. Finding the missing piece and putting it in made the picture complete.


There’s a real sense of accomplishment when the last piece of the puzzle is put in place.


It’s the same finishing a proposal…the final piece is now in place. The hard work of gathering the info, preparing the Scope of Work, and pricing are done. All that’s left is putting them together to provide a clear picture for the customer.


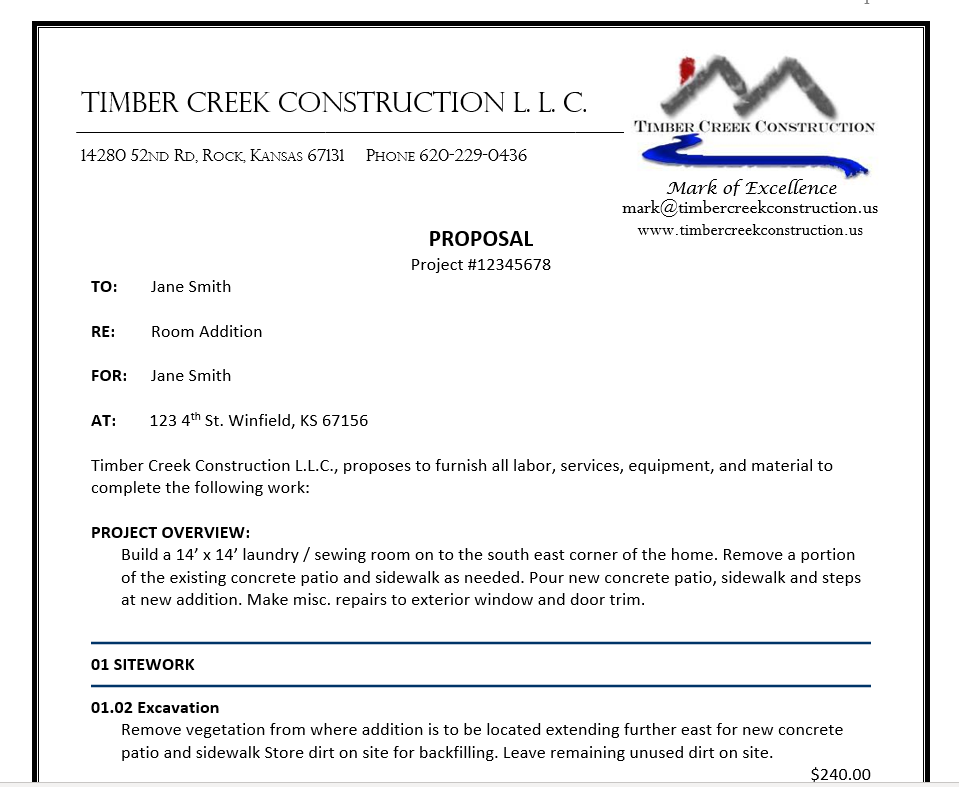
Jane Smith’s laundry/sewing room project.


Start with the Proposal template.

Insert the customer information in the open areas at the top of the first page as it pertains to the project.

To: This is the name of the person who requested the proposal or is responsible for the project organization.

Re: This is a name describing this specific construction project.

For: This is the party or organization for who the project is going to be done for.

At: This is the address of where the construction project is going to be performed.

Copy and paste the description of the work to be performed and material to be supplied from the Bid Sheet on to the Proposal template. (See below)

Next, take the prices from the Worksheet for each individual described action on the Proposal and place it on the right side of the page. At the end of each section put the total price for that section. (See below)

Now that the description of the work to be performed, the materials to be used, the prices for each action and the totals of each section have been placed on the Proposal template, it’s time for the project to be totaled. Complete the Proposal by defining the payment schedule, determining the date in which the Proposal will expire and the duration of time to complete the project. The only thing left is signing of the document.

Once the proposal is signed, I recommend following up with a Contract. Even though the signed Proposal serves as a legal and binding document, there is nothing in the Proposal about when the project will be started. The Contract also includes more detailed customer information, a list of any referenced documents, a place for construction funding information, property specifics and legal terms and conditions.


We’ll look at a Contract in the next post.

If you’ve found this series on the “Blueprint for Building a Better Proposal” helpful and you or someone you know would be interested in the templates for Building a Better Proposal, keep checking back. In the next few weeks we have a big announcement coming.

How To Price A Construction Project Proposal

Now It’s Time to Give the Project A Dollar Amount


The next step in the “Blueprint for Building a Better Proposal” is to determine the price for the project. We’ve talked a lot about the importance of communication to provide a clear description of the work to be performed. Now we’ll go through the process of determining consistent and accurate prices.


Poor communication will cause heartache, poor pricing will cost you money.


We’ve gathered the necessary information and prepared the Scope of Work so let’s put some numbers to the project.


Here we’ll combine the next two steps in the process; determining what pricing is needed for each specific construction tasks to be performed and quantities pertaining to each.


STEP 3 – PRICING THE PROJECT


This process uses two different Excel spreadsheets:


The Worksheet
An Excel spreadsheet with all the construction sections and tasks listed out with optional overhead and profit markup formulas inserted in the appropriate locations.

The Data Base
An Excel spreadsheet with prices for material and labor for a wide variety of specific construction tasks.


Based on the descriptions on the Bid Sheet, content from the Data Base will be copied and pasted into the correlating cells on the Worksheet.

EXAMPLE PROJECT:


Using Jane Smith’s Scope of Work for her laundry/sewing room addition we’ll determine the right information that needs to be copied from the Data Base and pasted to the Worksheet. Reference the Smith, Scope of Work here


Questions need to be answered like:


Which tasks need to be inserted into the Worksheet? Many of the tasks have options; which to use, will depend on the specifics of the project.


For example; How is the excavation, trenching and landscaping going to be done…with a skid loader, mini excavator, by hand or a combination?

Smith, Addition – Scope of Work, Sitework Section:


Data Base:
Copy pertinent cells to be pasted to the worksheet. (highlighted cells)


Smith Addition – Worksheet, Sitework Section:
Paste copied cells in worksheet template. (highlighted cells)


More questions that need to be answered:
Is the footing going to be formed with wood or poured in the ditch without any forms?


Smith, Addition – Scope of Work, Foundation Section:


Data Base:
Copy pertinent cells to be pasted to the worksheet. (highlighted cells)


Smith Addition – Worksheet, Foundation Section:

Paste copied cells in worksheet template. (highlighted cells)


After the pertinent information from the Data Base has been placed on the Worksheet it’s time to fill in the specific quantities. This will then provide the prices for the work to be done.


STEP 4 – QUANTITIES

On the Worksheet you will fill in the quantity needed to do the work on that line item. This may be lineal feet, square feet, square yards, cubic feet, cubic yards or numbers of pieces. Once this is completed you will now have prices for the Proposal.


Notice the highlighted cells in this spreadsheet. These are adjustments made due to the attributes of specific tasks on specific projects. In the case of this project the small size and location of the work in the back yard require some additional work and therefore additional cost.


I know this is a lot of content and information but it’s not as scary as it appears at first glance. The question that you need to ask yourself…


Do I want to be intentional at serving the customer’s needs at a profit or just guess and take a chance?


The next step is to bring all the pieces together in a thorough and accurate proposal that will give the customer a clear picture of what they’re getting and how much it’s going to cost. Check back next week for this part of the process.


How To Price A Construction Project Proposal

Now It’s Time to Give the Project A Dollar Amount


The next step in the “Blueprint for Building a Better Proposal” is to determine the price for the project. We’ve talked a lot about the importance of communication to provide a clear description of the work to be performed. Now we’ll go through the process of determining consistent and accurate prices.


Poor communication will cause heartache, poor pricing will cost you money.


We’ve gathered the necessary information and prepared the Scope of Work so let’s put some numbers to the project.


Best Price


Here we’ll combine the next two steps in the process; determining what pricing is needed for each specific construction tasks to be performed and quantities pertaining to each.


STEP 3 – PRICING THE PROJECT


This process uses two different Excel spreadsheets:


The Worksheet
An Excel spreadsheet with all the construction sections and tasks listed out with optional overhead and profit markup formulas inserted in the appropriate locations.

The Data Base
An Excel spreadsheet with prices for material and labor for a wide variety of specific construction tasks.


Based on the descriptions on the Bid Sheet, content from the Data Base will be copied and pasted into the correlating cells on the Worksheet.

EXAMPLE PROJECT:


Using Jane Smith’s Scope of Work for her laundry/sewing room addition we’ll determine the right information that needs to be copied from the Data Base and pasted to the Worksheet. Reference the Smith, Scope of Work here


Questions need to be answered like:


Which tasks need to be inserted into the Worksheet? Many of the tasks have options; which to use, will depend on the specifics of the project.


For example; How is the excavation, trenching and landscaping going to be done…with a skid loader, mini excavator, by hand or a combination?

Smith, Addition – Scope of Work, Sitework Section:


Data Base:
Copy pertinent cells to be pasted to the worksheet. (highlighted cells)


Smith Addition – Worksheet, Sitework Section:
Paste copied cells in worksheet template. (highlighted cells)


More questions that need to be answered:
Is the footing going to be formed with wood or poured in the ditch without any forms?


Smith, Addition – Scope of Work, Foundation Section:


Data Base:
Copy pertinent cells to be pasted to the worksheet. (highlighted cells)


Smith Addition – Worksheet, Foundation Section:

Paste copied cells in worksheet template. (highlighted cells)


After the pertinent information from the Data Base has been placed on the Worksheet it’s time to fill in the specific quantities. This will then provide the prices for the work to be done.


STEP 4 – QUANTITIES

On the Worksheet you will fill in the quantity needed to do the work on that line item. This may be lineal feet, square feet, square yards, cubic feet, cubic yards or numbers of pieces. Once this is completed you will now have prices for the Proposal.


Notice the highlighted cells in this spreadsheet. These are adjustments made due to the attributes of specific tasks on specific projects. In the case of this project the small size and location of the work in the back yard require some additional work and therefore additional cost.


I know this is a lot of content and information but it’s not as scary as it appears at first glance. The question that you need to ask yourself…


Do I want to be intentional at serving the customer’s needs at a profit or just guess and take a chance?


The next step is to bring all the pieces together in a thorough and accurate proposal that will give the customer a clear picture of what they’re getting and how much it’s going to cost. Check back next week for this part of the process.


How To Prepare A Scope Of Work For A Construction Proposal


This Is A Critical Part of Clear Communication


We began this “Blueprint for Building a Better Proposal” series with communication and the problems that occur when it’s done poorly or not at all. This is without a doubt the area where most contractors struggle. It doesn’t have to be this way.


Communication is the most important part of the proposal process.


Things that are unfamiliar seem overwhelming. This is true for both the customer and the contractor. The customer when not understanding what the contractor is talking about and contractor when not having a system for preparing proposals.


Our “Blueprint for Building a Better Proposal” system has specific pieces and steps for simplifying the process.


Last week we went through Step 1 – Gathering Information. This is where the customer’s why is uncovered, and the physical information is gathered and recorded. Here, we’ll breakdown Step 2 – Preparing the Scope of Work.


What is a Scope of Work?


A Scope of Work, …clearly defines the project requirements, milestones, deliverables, end products, documents and reports that are expected to be provided by the vendor. It helps in the smooth functioning of a project/work contract wherein both parties can avoid ambiguities and situations leading to dispute. It is the first step to building a mutually beneficial collaboration between a vendor and his customer. From a Udemy blog post written by Richa


According to Juan Rodriguez’s The Balance Small Business article, “Must-Have Items on a Construction Scope of Work”, the basic elements…of a scope of work document describes all of the work to be done on a project, who is responsible for completing the work, how the work must be performed (techniques used), and what materials will be used.


Communication needs be simple and direct while explaining clearly and thoroughly.


Writing out the description of work to be done in terminology that both the customer and the contractor understand is key to clarity. It needs to include enough specifics to be thorough without being too technical. Communication isn’t any good if it’s confusing.


EXAMPLE PROJECT:


When meeting with customer Jane Smith we found out that she wanted to add on a laundry/sewing room. She loved to sew and did a lot of it. Currently she used the table in the main floor dining room and the sewing machine in the basement. Her washer and dryer were in two separate closets in the master bathroom. This made for an inconvenience when sewing or doing laundry.


Once we’ve determined the why and gathered the pertinent information…


…it’s time to prepare the scope of the work.


Once this process has been finished for the complete project, we’ll have a Scope of Work ready to be transferred to the Proposal template.


Next, we’ll start figuring out the prices for individual items using the Worksheet and Data Base.


How to Be Sure You Don’t Overlook Something…


When Gathering Information for A Construction Proposal


You or someone you know has experienced a construction project horror story. A dream project that somewhere along the way turned into a nightmare. A communication disconnect that caused the customer and the contractor to be at odds.


Why is miscommunication in construction so common?


In the first post of this Blueprint for Building A Better Proposal series, I wrote about this communication problem and that a better proposal is the contractor’s responsibility. Contractors don’t start a construction project with the intention of a misunderstanding…so why is it too often the result?


Most people in the construction trades, learned their specific trade, but were never taught how to do a proposal.


In the second post of the series I explained the parts of the proposal system. In the third, I went through the different steps of the process


In this post we’ll break down STEP 1 – Gathering Information:


The first information you should gather is WHY. Why does the customer want to do this project? Do they need more space, does something need repaired or replaced, are they looking to make it more usable, or is it just because they want to? Knowing the why early helps determine a clear direction going forward.


Unless the customer has a full set of blueprints and specifications, a site visit should be one of the very first parts of this step. Every individual project is as different as the customer is. Without blueprints, specs or seeing the existing location the chances of giving the customer the project they want, is almost impossible.


Information that needs to be gathered:

  • Project info (customer name, mailing address, project address if different than mailing, phone number, email address, project overview, any other relevant information that you need)
  • Measurements and dimensions, existing and new
  • Building materials, existing and new
  • Pictures of pertinent areas and existing construction
  • Customer’s design ideas and finishes


The important part is to not overlook something.


Use whatever way works best for you to gather the info. Early on I used graph paper and a clip board. I continued to go through different processes before getting where I currently am.


After the graph paper I developed a printed Bid Sheet that had a pre-determined list of the different construction tasks that might be needed. Next to each task there was space for writing down a brief description, dimensions, specific notes, drawings, etc. Having a pre-determined list is a great way to minimize the possibility of forgetting something.


Now I use the same basic Bid Sheet on a Microsoft Surface tablet and can either type, write or draw right on the document. This streamlines the process and reduces the chance of something getting overlooked.


Forgetting to include something in the proposal is a sure way to lose money.


There are over one hundred items listed on the Bid Sheet and it still doesn’t cover every possibility. Construction projects vary a lot. Even small projects can include a lot of different pieces. If you leave one of the pieces out, someone’s going to end up unhappy.


If you start with a list, you’re less likely to overlook something.


Next week we’ll take the information gathered on the Bid Sheet and turn it into a Scope of Work.


An Overview of the “Blueprint for Building A Better Proposal”


An Explanation of How That System Works


This is the third post in the Blueprint for Building A Better Proposal series. The first focused on the importance of communication between contractor and customer and the problems that can happen without it. The second listed the foundational pieces of the proposal system

In this post we’ll take an overview of the process and how the different pieces fit together.

STEP 1 – Gathering Information

Once you’ve been contacted by a potential customer schedule a meeting to discuss the customer’s dreams and find out what they hope to get from this project. At this initial meeting you will gather information –

  • Measurements and dimensions, existing and new

  • Building materials, existing and new

  • Pictures of pertinent areas and existing construction

  • Customer’s design ideas and finishes

The information gathered in this meeting can be recorded in a variety of ways. The important thing in this step is to gather any and all information needed to prepare an accurate proposal. It can be handwritten on a printed out Bid Sheet. It can be typed in an electronic Bid Sheet on a tablet, smart phone or laptop. The purpose for using the Bid Sheet is that all the areas of a construction project are listed out, this minimizes overlooking things.

STEP 2 – Preparing the Scope of Work

After the preliminary information has been gathered it’s time to clarify the scope of the project by writing out the description of each specific task in terminology that both the customer and the contractor understand. It needs to include enough specifics to be thorough without being too technical. It doesn’t help communication if it’s confusing for the customer. This written description on the Bid Sheet gets transferred to the Proposal and serves as a written scope of work to be performed and materials to be provided.

STEP 3 – Pricing the Project

Next is putting prices to the project. This process involves two different Excel spreadsheets, the Worksheet and the Data Base. Based on the descriptions written on the Bid Sheet, content from the Data Base will be copied and pasted into the correlating cells on the Worksheet. After the pertinent information from the Data Base has been placed on the Worksheet it’s time to fill in the specific quantities.

STEP 4 – Quantities

On the Worksheet you will fill in the quantity needed to do the work on that line item. This may be lineal feet, square feet, square yards, cubic feet, cubic yards or numbers of pieces. Once this is completed you will now have prices for the Proposal. 

STEP 5 – Preparing the Proposal

Now you have everything you need to prepare the Proposal. You will use the description from the Bid Sheet and the prices from the Worksheet and put them both on the Proposal. Now you have a description for each specific task to be provided and the price for each. After filling out the customer’s information, the total project price, how payments are to be made and the duration of time to do the project, the Proposal is ready to present to the customer.

Next week I’ll go into the details of Gathering Information.